No bookmark
VIDEO

AVALANCHE MANAGEMENT USING THE DCMR METHOD
RISK MANAGEMENT WITH D x C - M = R

DECISION MAKING AT THE CRUX

Risk management always deals with the probability of a danger and the possible consequences. 

The same applies to avalanche assessment. It involves clarifying how probable an avalanche is, so how dangerous it is. And considering the possible consequences, therefore how drastic the result of an avalanche would be. Implementing targeted measures such as load reduction intervals, safety intervals, safe assembly points and traveling one at a time makes it possible to decrease the probability of an avalanche and/or ease the consequences (e.g. because there is only ever one person in the dangerous area and there are enough helpers ready to take any necessary rescue measures).  

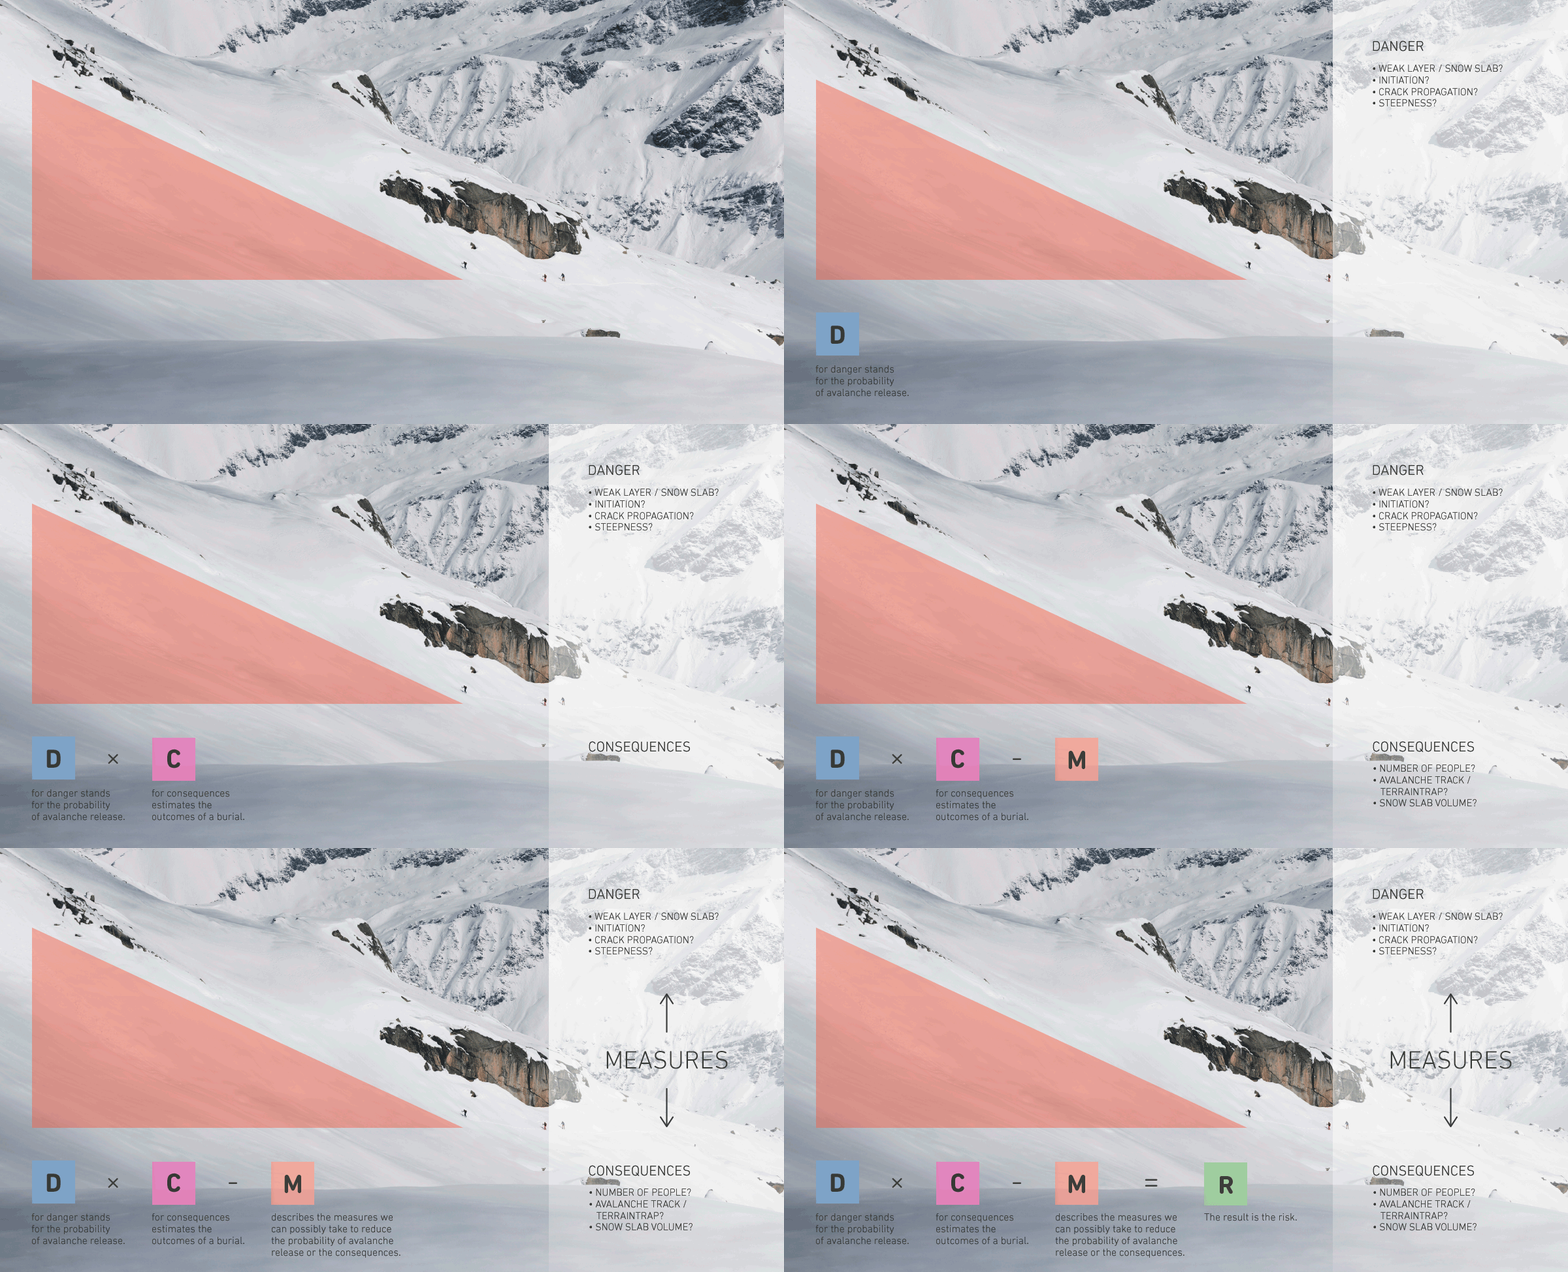
All three aspects together – danger, consequences and measures – determine the risk. In short, you could say: D x C - M = R. This means that the probability of an avalanche release (D) times its consequences (C) reduced by possible measures (M) results in the risk (R) that we have to estimate in order to make a yes/no decision. 

In the tour planning phase, we are often yet to make any of our own observations in the mountains. So the first thing to do is gather information about the terrain, snow, weather, etc. Important sources of information for this include the avalanche bulletin, the weather report, topographic maps, guide books, snow profiles and digital maps with terrain steepness, run out zones and consequence zones, meaning terrain traps (ditches, bowls, escarpments, obstacles) that could lead to a deeper burial and major injuries. 

Planning at home or in the cabin using the tried-and-tested 3x3 filter method is the first “safety filter”. We try to get an idea of the danger and the consequences: are the planned region and specific tour compatible with the conditions, the terrain and the group? Good planning can prevent bad decisions being made from the very beginning.  

In the second filter/level, in the mountains, initial information is gathered from the terrain, e.g. what the wind, weather, visibility and amount of new snow are actually like or whether there are warning signs or whumpf sounds, fresh avalanches or cracks that appear when you step on the snowpack. We can use this to correct or confirm our ideas from our plan. 

In the third filter/level, we would be standing on the individual slope and must now make a decision: stop or go? If the decision is “go”, the next thing to decide is how to tackle the slope. 

THE INTERPLAY OF DANGER AND CONSEQUENCES

THE INTERPLAY OF DANGER AND CONSEQUENCES

Whether in the planning phase, in the mountains or on the individual slope – we always consider the danger (probability of an avalanche) and the resulting consequences. It is important to ask the right questions about the two factors and that we keep an eye on them both. Logically, at least one of the two factors must be low for the risk to remain at an acceptable level.

DANGER, CONSEQUENCES, MEASURES, RISK

The probability of a slab avalanche is extremely difficult to estimate. We start with the four necessary “ingredients” for a snow slab and then ask ourselves simplified questions to help us estimate the probability.

DANGER CONSEQUENCES MEASURES RISK

DANGER 

The widely cited “four ingredients” of a slab avalanche can be used to estimate the probability of release. These are: 

  1. Is there a weak layer with a slab on top and can I disturb this (unfavorable layers)? 
  2. Can the weak layer be stressed (initiation)? 
  3. Can a crack in the weak layer propagate (crack propagation)? 
  4. Is the slope steep enough for the slab to slide (>30°)? 

In the planning phase, you know very little about the snowpack. So the first three questions are difficult to answer. In this phase, the only facts that can be determined are the slope steepness and whether the slope is in one of the dangerous areas identified in the avalanche bulletin (core zone). 

That’s why we plan using the 30° method, which show all of the potential cruxes on the tour – so all of the slopes that are steeper than 30° that are in the dangerous areas indicated in the avalanche bulletin. 

CONSEQUENCES 

The consequences of an avalanche significantly depend on the following factors: 

  1. Are there any terrain traps (ditches, bowls, escarpments, obstacles) that could lead to a deeper burial or physical injuries? 
  2. How big is the slope above me and how far would I be carried? 
  3. How thick could the slab be and how much snow could move? 
  4. Can you ensure that only one person will be caught by the avalanche and that there are other people on site who could quickly implement search and rescue measures? 

In the planning stage, you can use the map to estimate whether the selected slope is big or small and whether pile-up zones, escarpments or obstacles pose a danger. The possible thickness and, therefore, mass of the slab can be determined based on the snowpack description from the avalanche bulletin or from online snow profiles. You can use the terrain features, slope length and route to roughly estimate whether there are safe assembly points and whether traveling one at a time is possible. 

Compared to danger, consequences are often easier to estimate in the planning stage and on the individual slope.

MEASURES

Possible measures include all of the options you have for decreasing the likelihood of an avalanche or easing the consequences. 

For example, the track you take, where exactly you plan to travel, can have an impact on initiation. When there is a persistent weak layer problem, it is often more favorable to travel in bowls or areas with plenty of snow in order to keep as far away from the weak layer as possible and, therefore, make triggering less likely. By contrast, if there is a wind-drifted snow problem, you should seek out ridges and peaks, where there will often be very little to no wind-drifted snow. 

Traveling one at a time, safety intervals and safe assembly points help to ease the consequences of an avalanche. Because locating and freeing several burial victims takes significantly longer than if everyone has “only” one burial victim to deal with. And time is critical in the event of an avalanche burial. 

RISK 

The result of the three points named above – danger, consequences and measures – is the risk you are confronted with. What makes a risk assessment difficult is that there are no clear thresholds, e.g. a specific number or a clear limit. Furthermore, each person’s willingness to take risks is different.  

In any case, it is important that the risk is recognized, openly communicated and consciously examined. 

When planning the tour, the “Is the tour ok?” tool can help you reasonably estimate and assess the risk. You will learn more about this later.

PRACTICAL TOUR PLANNING WITH THE HELP OF DCMR

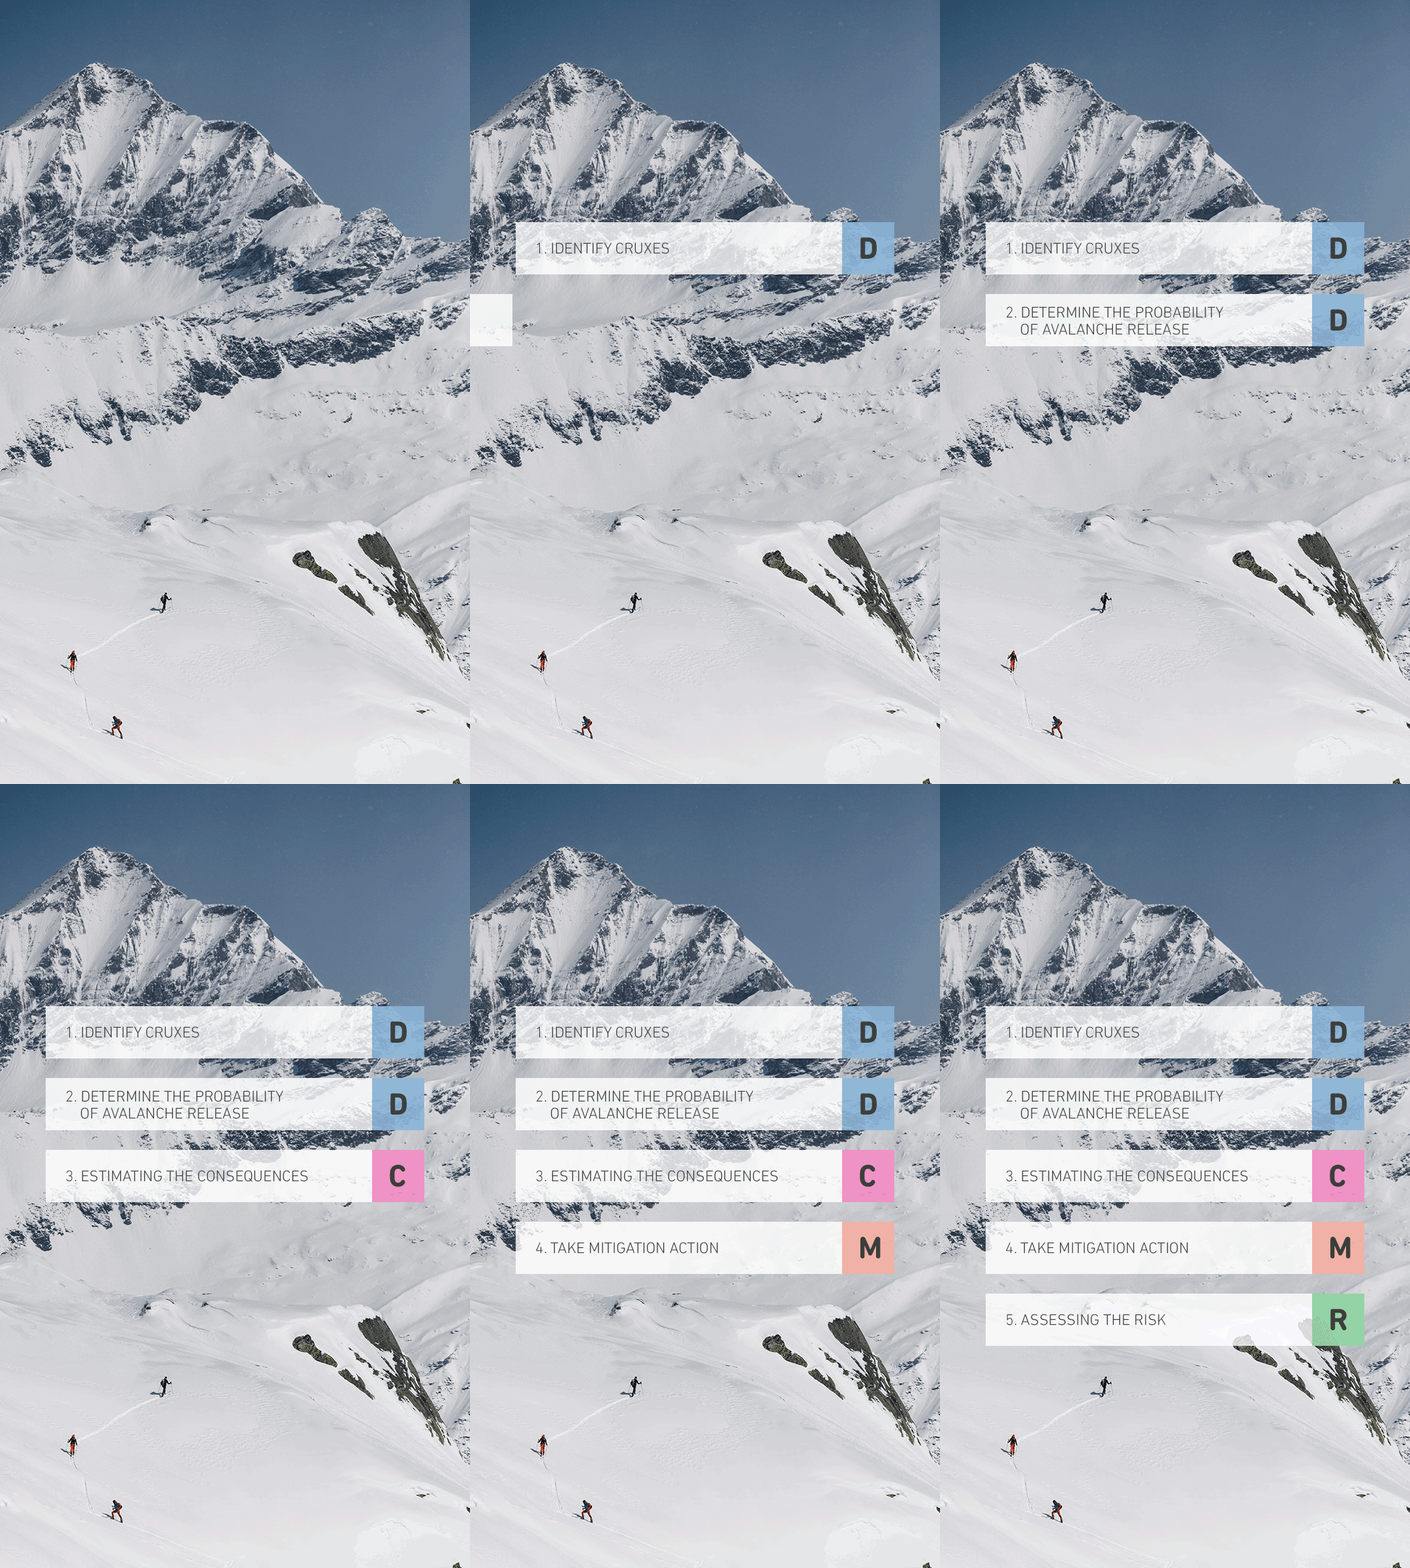
The practical way to plan a tour using the DCMR method is to take it step by step:

PRACTICAL TOUR PLANNING WITH THE HELP OF DCMR
  1. IDENTIFYING CRUXES

    The first thing to do is identify cruxes, i.e. determine the slopes where an avalanche could potentially occur. 
  2. EVALUATING THE PROBABILITY OF AN AVALANCHE

    In the second step, we need to evaluate the probability of an avalanche occurring, i.e. how likely it is that a slab avalanche will occur on these slopes. 
  3. ESTIMATING THE CONSEQUENCES

    The third step is to estimate the consequences that an avalanche on this slope would have. 
  4. PLANNING MEASURES

    Then we must plan possible measures for reducing the probability and/or easing the consequences of an avalanche. 
  5. ASSESSING THE RISK

    Finally we determine the risk and come to a decision. Specifically: a) We can go on the tour; b) We can try the tour, but should have a plan B up our sleeves for critical cruxes; or c) The tour is not suitable for the current conditions, the terrain or the group. In the latter case, we must think about a different tour. 
30° Methode 30° Method 30° Method

30° METHOD: IDENTIFYING CRUXES

The 30° method can be used to identify potential cruxes:  

  1. We filter out the slopes that are steeper than 30° and that we want to travel on or that have hazard zones we will travel through. 

  2. Slopes that are outside of the dangerous areas (core zones) listed in the avalanche bulletin can be “disarmed”, i.e. they are not counted among the cruxes. Because slab avalanches are observed almost exclusively on the slope aspects, elevations and terrain features mentioned in the avalanche bulletin. Therefore, all other areas can be considered fairly safe. 

  3. In addition, we can “disarm” slopes in our hazard zone that are above our route but that we will not directly travel on if they have wind-drifted or wet snow problems. This means: We do not include these slopes in our evaluation because remote triggering is observed almost exclusively when there are persistent weak layers or new snow problems; only then must we expect avalanches in the runout zone. 

PLOTTING THE TOUR MARKING 30° SLOPES “DISARMING” NON-RELEVANT SLOPES CONSIDER REMOTE TRIGGERING

PLOTTING THE TOUR

First, we sketch our planned tour on the map. Either using a pencil on a paper map or using a tour planning app (e.g. White Risk, alpenvereinaktiv, etc.) on a digital map with a slope angle layer. 

MARKING 30° SLOPES

Now we determine the steepness of the slopes on and directly above our route and mark all those that are steeper than 30°.

“DISARMING” NON-RELEVANT SLOPES

Slopes that are not in the dangerous areas indicated by the avalanche bulletin can be “disarmed”. This could be slopes on which no avalanche problems are forecast or slopes that are outside of the indicated slope aspects, elevations or terrain features. Avalanches are very unlikely here; however, we keep these slopes in the back of our mind for the evaluation we make when we reach the mountains, in case reality does not match the forecast (avalanche bulletin).

CONSIDER REMOTE TRIGGERING

Finally, we consider the slopes that we will not travel on, but which have a run out zone that could affect us. Here, we can “disarm” the slopes where remote triggering is not expected. Whether remote triggering is possible depends on the avalanche problems: You must expect remote triggering in the event of new snow problems or persistent weak layers, but not temperature or wind-drifted snow problems. Warning: If there is a general warning about spontaneous avalanche release, this slope should of course be considered a dangerous area.

THE STEEPER THE SLOPE, THE MORE DANGEROUS

The widely cited “four ingredients” of a slab avalanche can be used to estimate the probability of an avalanche. These are: 

  1. Is there a weak layer with a slab on top and can I disturb this (unfavorable layers)? 
  2. Can the weak layer be stressed (initiation)? 
  3. Can a crack in the weak layer propagate (crack propagation)? 
  4. Is the slope steep enough for the slab to slide (>30°)? 

In the planning phase at home, you know very little about the snowpack. So the first three questions are difficult to answer from a distance. In this phase, the only facts that can be determined are the slope steepness and whether the slope is in one of the dangerous areas identified in the avalanche bulletin. 

“IS THE TOUR OK?”: A SIMPLE RISK ASSESSMENT TOOL SLOPE STEEPNESS AS AN INDICATOR ESTIMATING THE CONSEQUENCES ASSESSING THE RISK

“IS THE TOUR OK?”:
A SIMPLE RISK ASSESSMENT TOOL 

With the easy “Is the tour ok?” tool, you can make a good assessment of the risk during the planning phase. It comprises the following three aspects: 

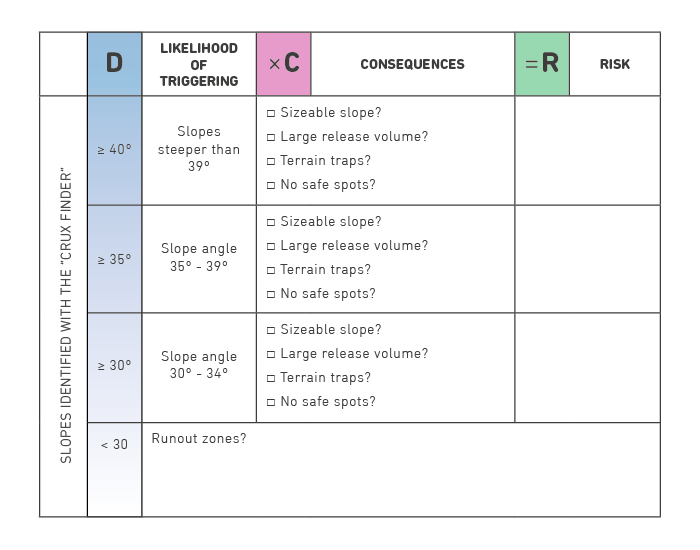
  • Probability of an avalanche: The four slope steepness categories (<30°, ≥30, ≥35° and ≥40°) can be used to roughly classify the identified cruxes. 
  • Consequences: Four questions can be used to estimate the potential consequences.  
  • Risk: By linking the consequences and avalanche probability, you can determine whether a crux should be classified as critical or non-critical.

SLOPE STEEPNESS AS AN INDICATOR

It is difficult to say anything about initiation and propagation in the planning phase, which is why we simplify the whole thing and look at slope steepness as an indicator because it correlates with the probability of an avalanche. 

If you are already in the mountains or in a cabin and have already been able to gather observations, your information about visibility, initiation and crack propagation should of course be included in the evaluation. 

Without these indications, you have to limit yourself to slope steepness. It has been proven that the steeper a slope is, the easier it is to trigger. For this reason, we split slopes into four steepness categories.  

  • Green: <30° 
  • Yellow: ≥30° (30°–34°) 
  • Orange: ≥35° (35°–39°) 
  • Red: <40°

As the slope steepness increases, so does the probability of an avalanche and, therefore, the danger. 

ESTIMATING THE CONSEQUENCES: FOUR QUESTIONS 

The consequences are evaluated using four questions: 

  • Is the slope very steep (>60 vertical meters)?
    We evaluate whether a release would result in a serious burial. This information can be obtained from a map. 
  • Is a large fracture possible? 
    Or in other words: How much snow will come down? The more snow above you, the deeper and more serious a burial could be. To this end, you should observe the additional information in the avalanche bulletin. 
  • Are there any terrain traps?  
    These include ditches below that could lead to deeper burials or obstacles such as escarpments, rocks or trees that could lead to injury. Such terrain traps, which could make the consequences of a burial worse, can be identified on the map. 
  • No safe assembly points? 
    By finding suitable assembly points or cleverly organizing your group, you can prevent several people being buried. Having no safe assembly points will have a negative impact on the consequences. 

ASSESSING THE RISK

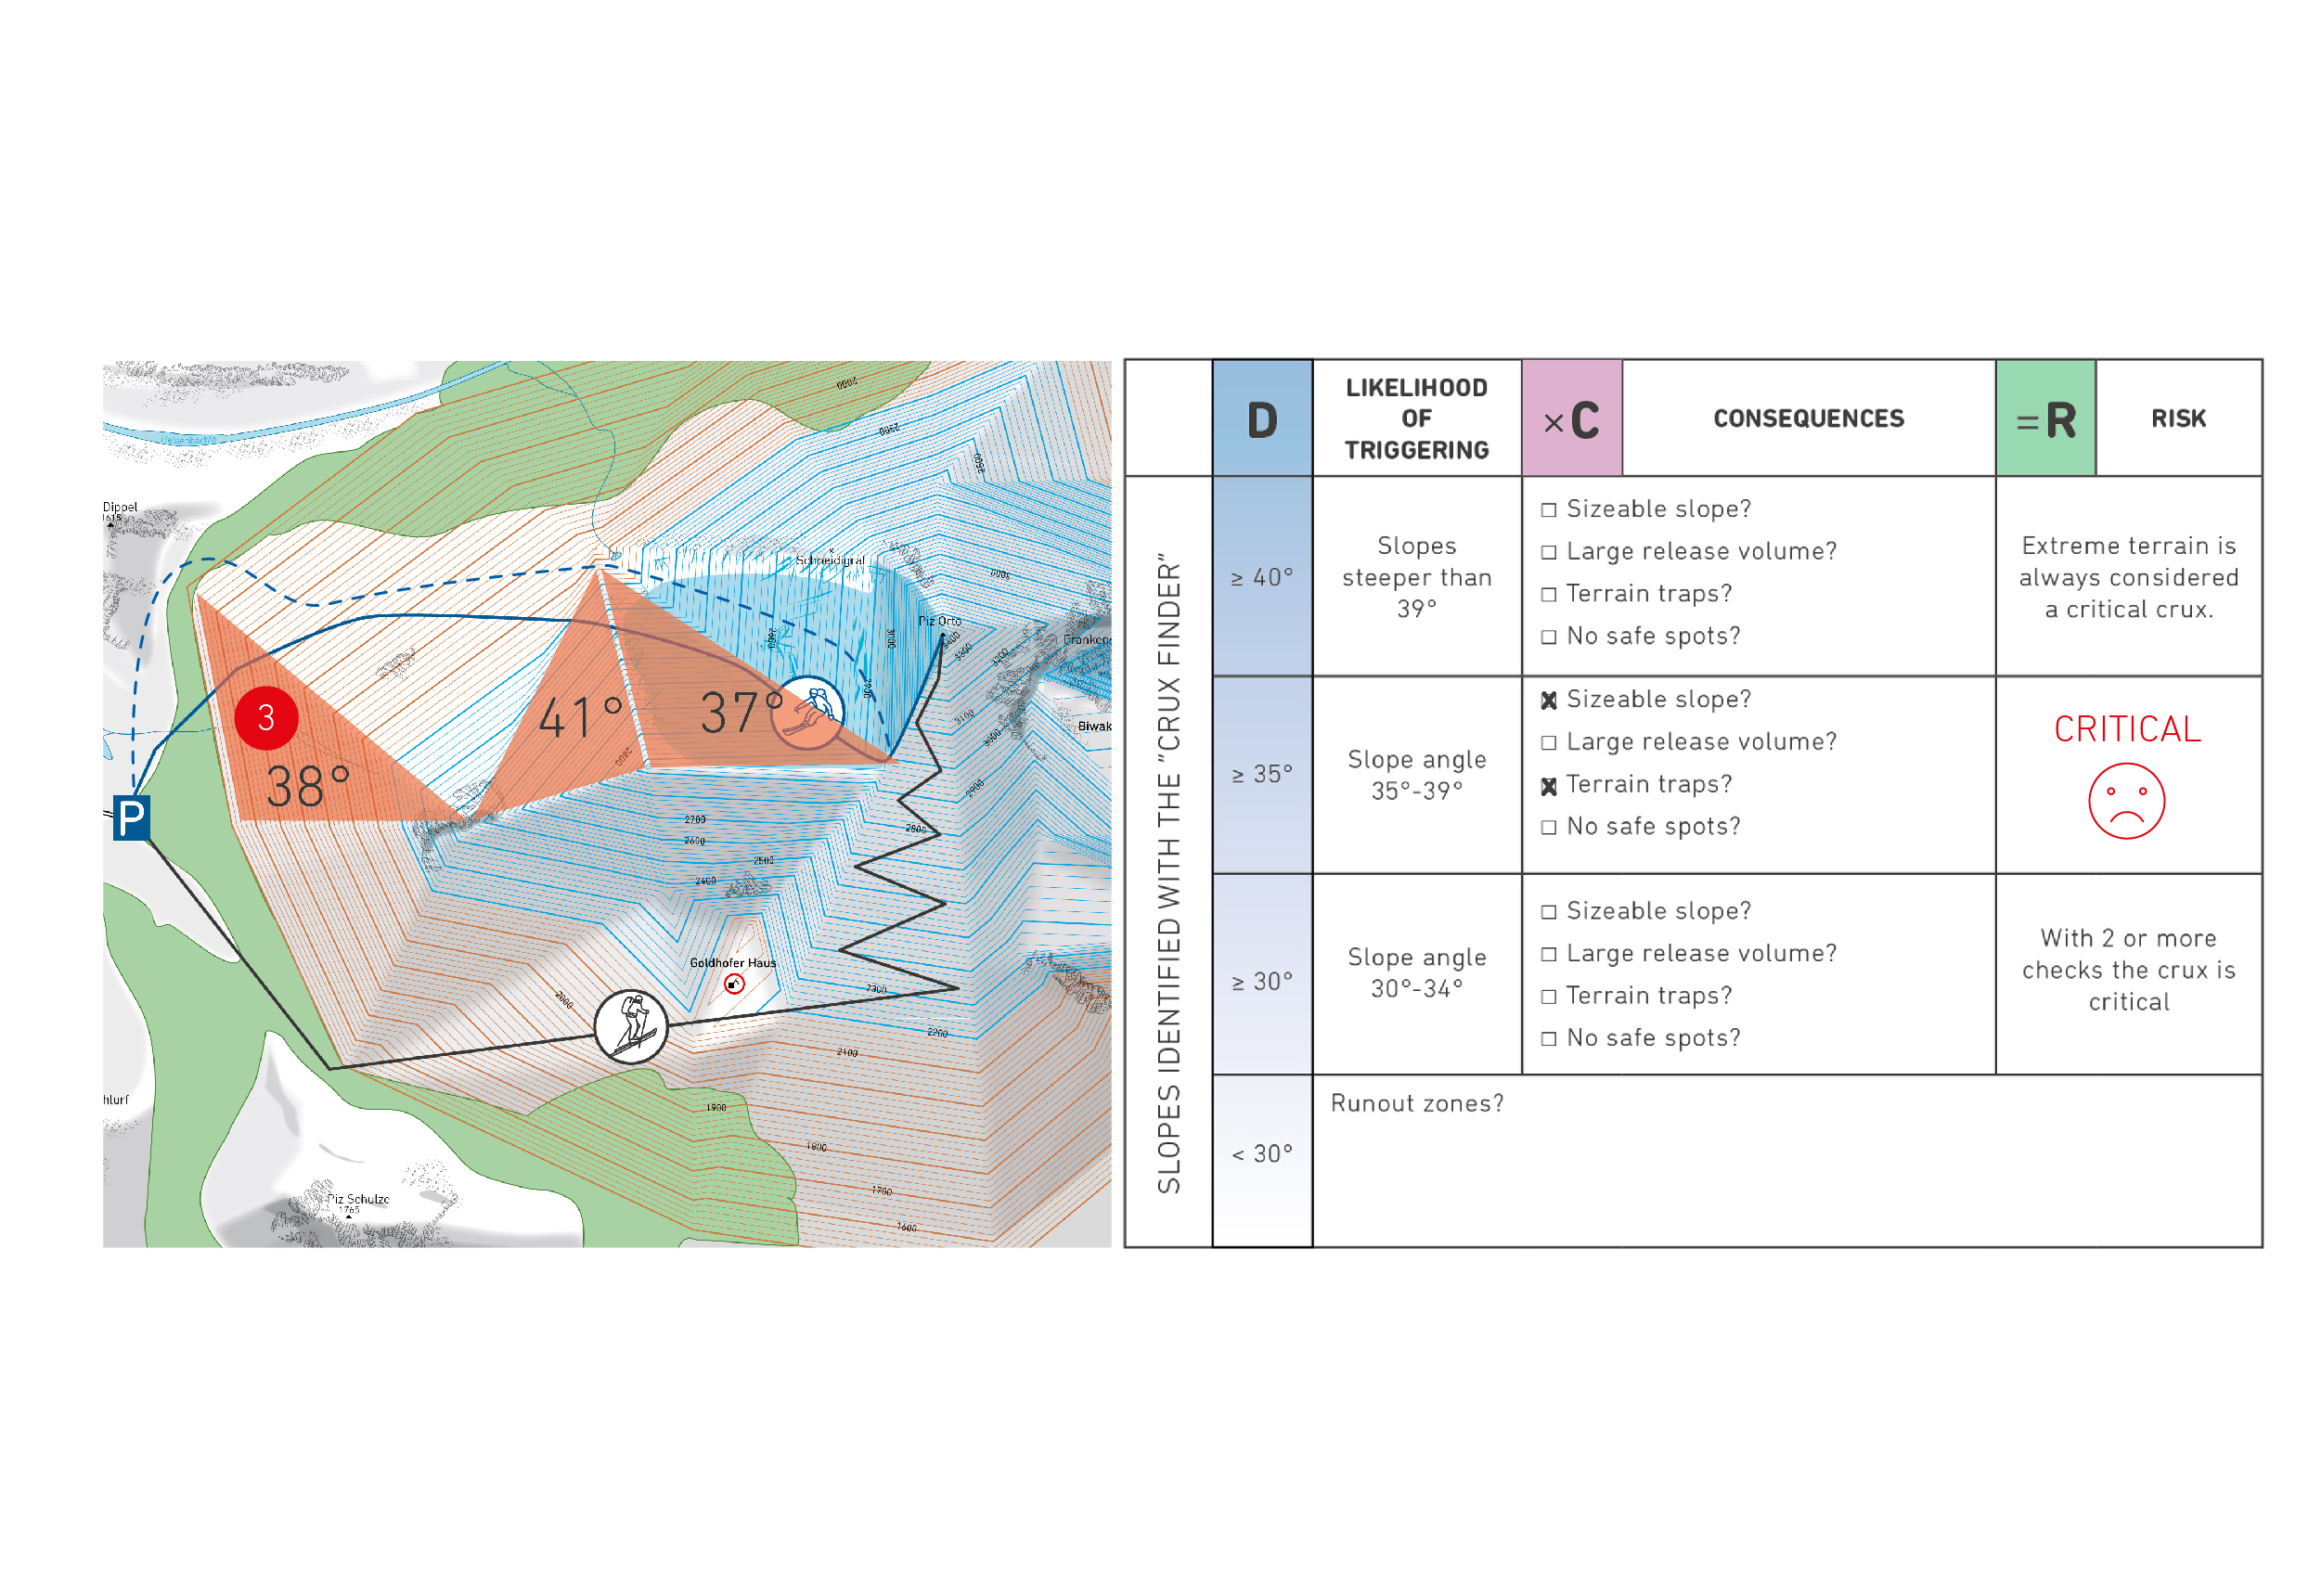
The probability of an avalanche (slope steepness) and the consequences (four questions) are now linked together to assess the risk. Specifically, this means: We look at how the cruxes that have been classified according to their steepness “stand up to” the four questions. The deciding factors are how many “yes” answers a crux gets, and which steepness category it is classed in. 

A crux in the ≥30° (yellow) category, i.e. slopes with a steepness between 30° and 34°, are classed as critical when at least two questions are answered with “yes”. 

For cruxes in the ≥35° category (orange, slope steepness 35°–39°), the risk should be classed as critical from just one “yes” answer. 

Cruxes steeper than ≥40° should generally be classed as critical, because the probability of an avalanche is high from the start. 

Tours or off-piste runs with critical cruxes without any real alternatives are generally not suitable. A defensive plan B is particularly important in situations where there is a high probability of an avalanche, e.g. if skier-triggered avalanches or spontaneous avalanches can be expected.

RISK ASSESSMENT WITH A TOUR PLANNING EXAMPLE

We now look at the remaining cruxes and assess their risk. If the risk is critical, you should consider whether targeted measures in the affected areas could decrease the danger or ease the consequences, e.g. load-reduction, safety intervals, safe assembly points, following tracks, optimal use of the terrain, etc.  

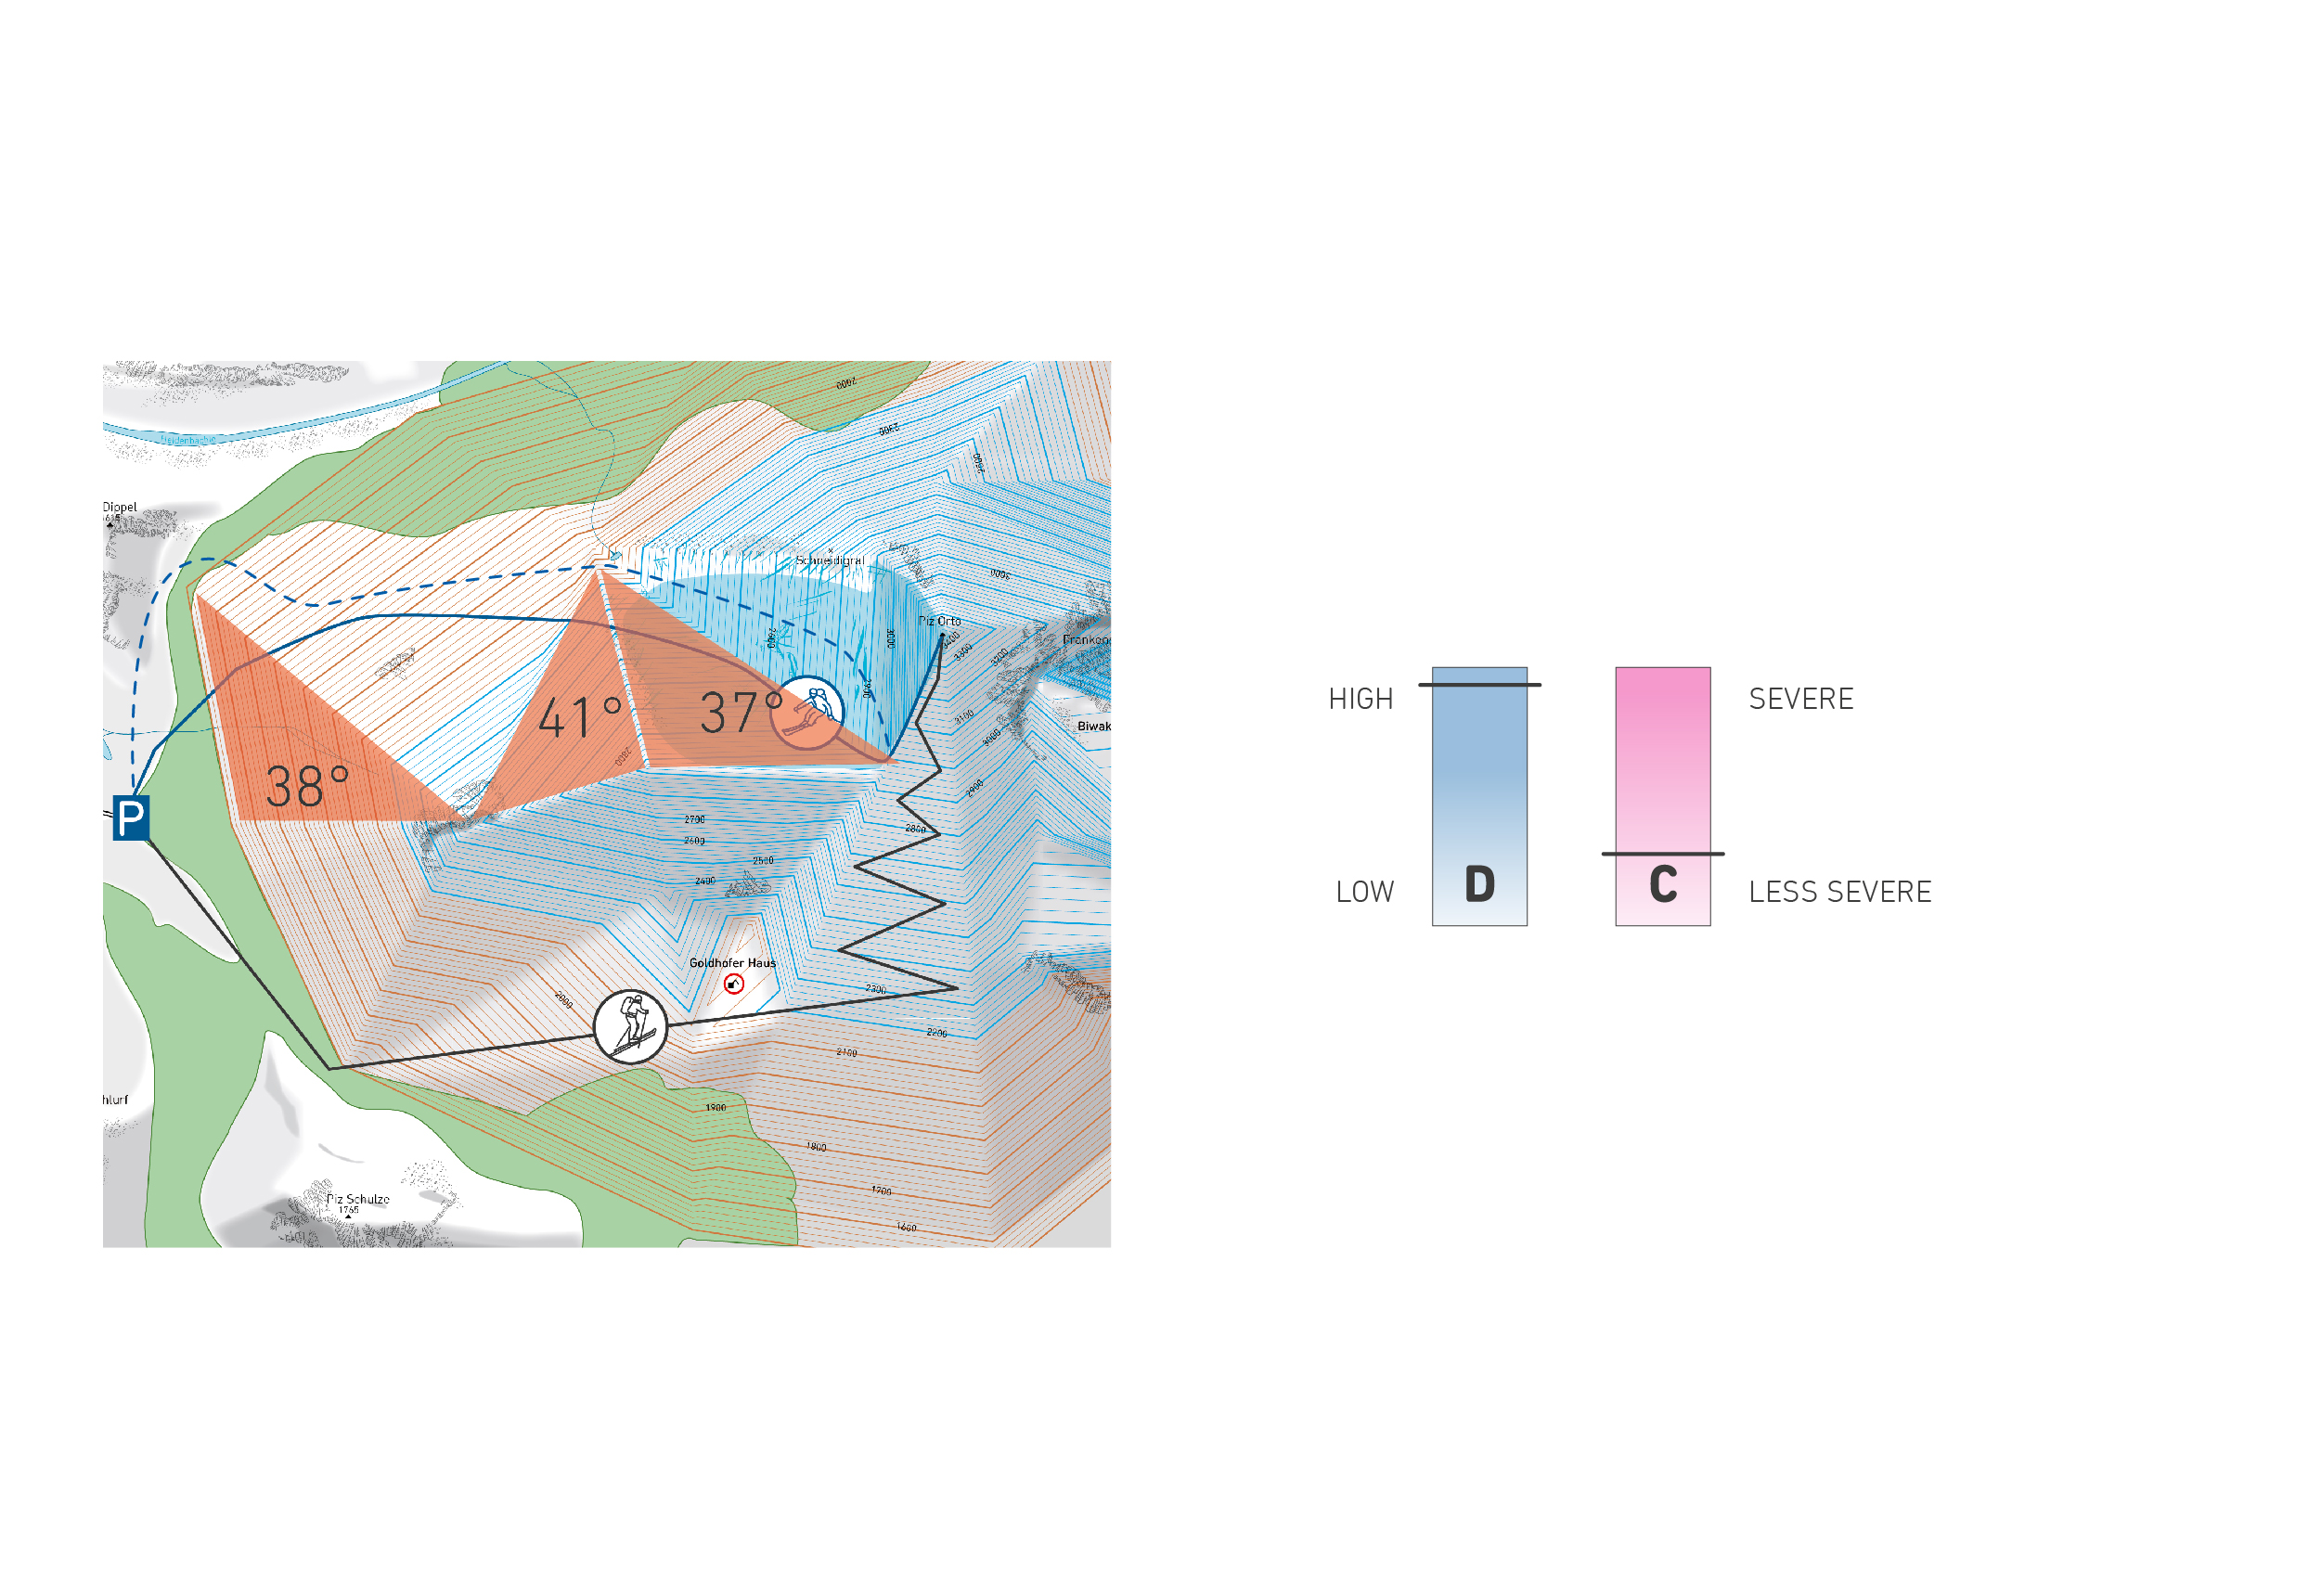
Because risk is always the product of the probability of a danger and its consequences, both factors should be linked together when making a risk assessment. In other words: If the probability of an avalanche is high, the consequences must be less severe – and vice versa.

THE CRUXES EVALUATING SLOPE 1 EVALUATING SLOPE 2 EVALUATING SLOPE 3 CONCLUSION

THE CRUXES

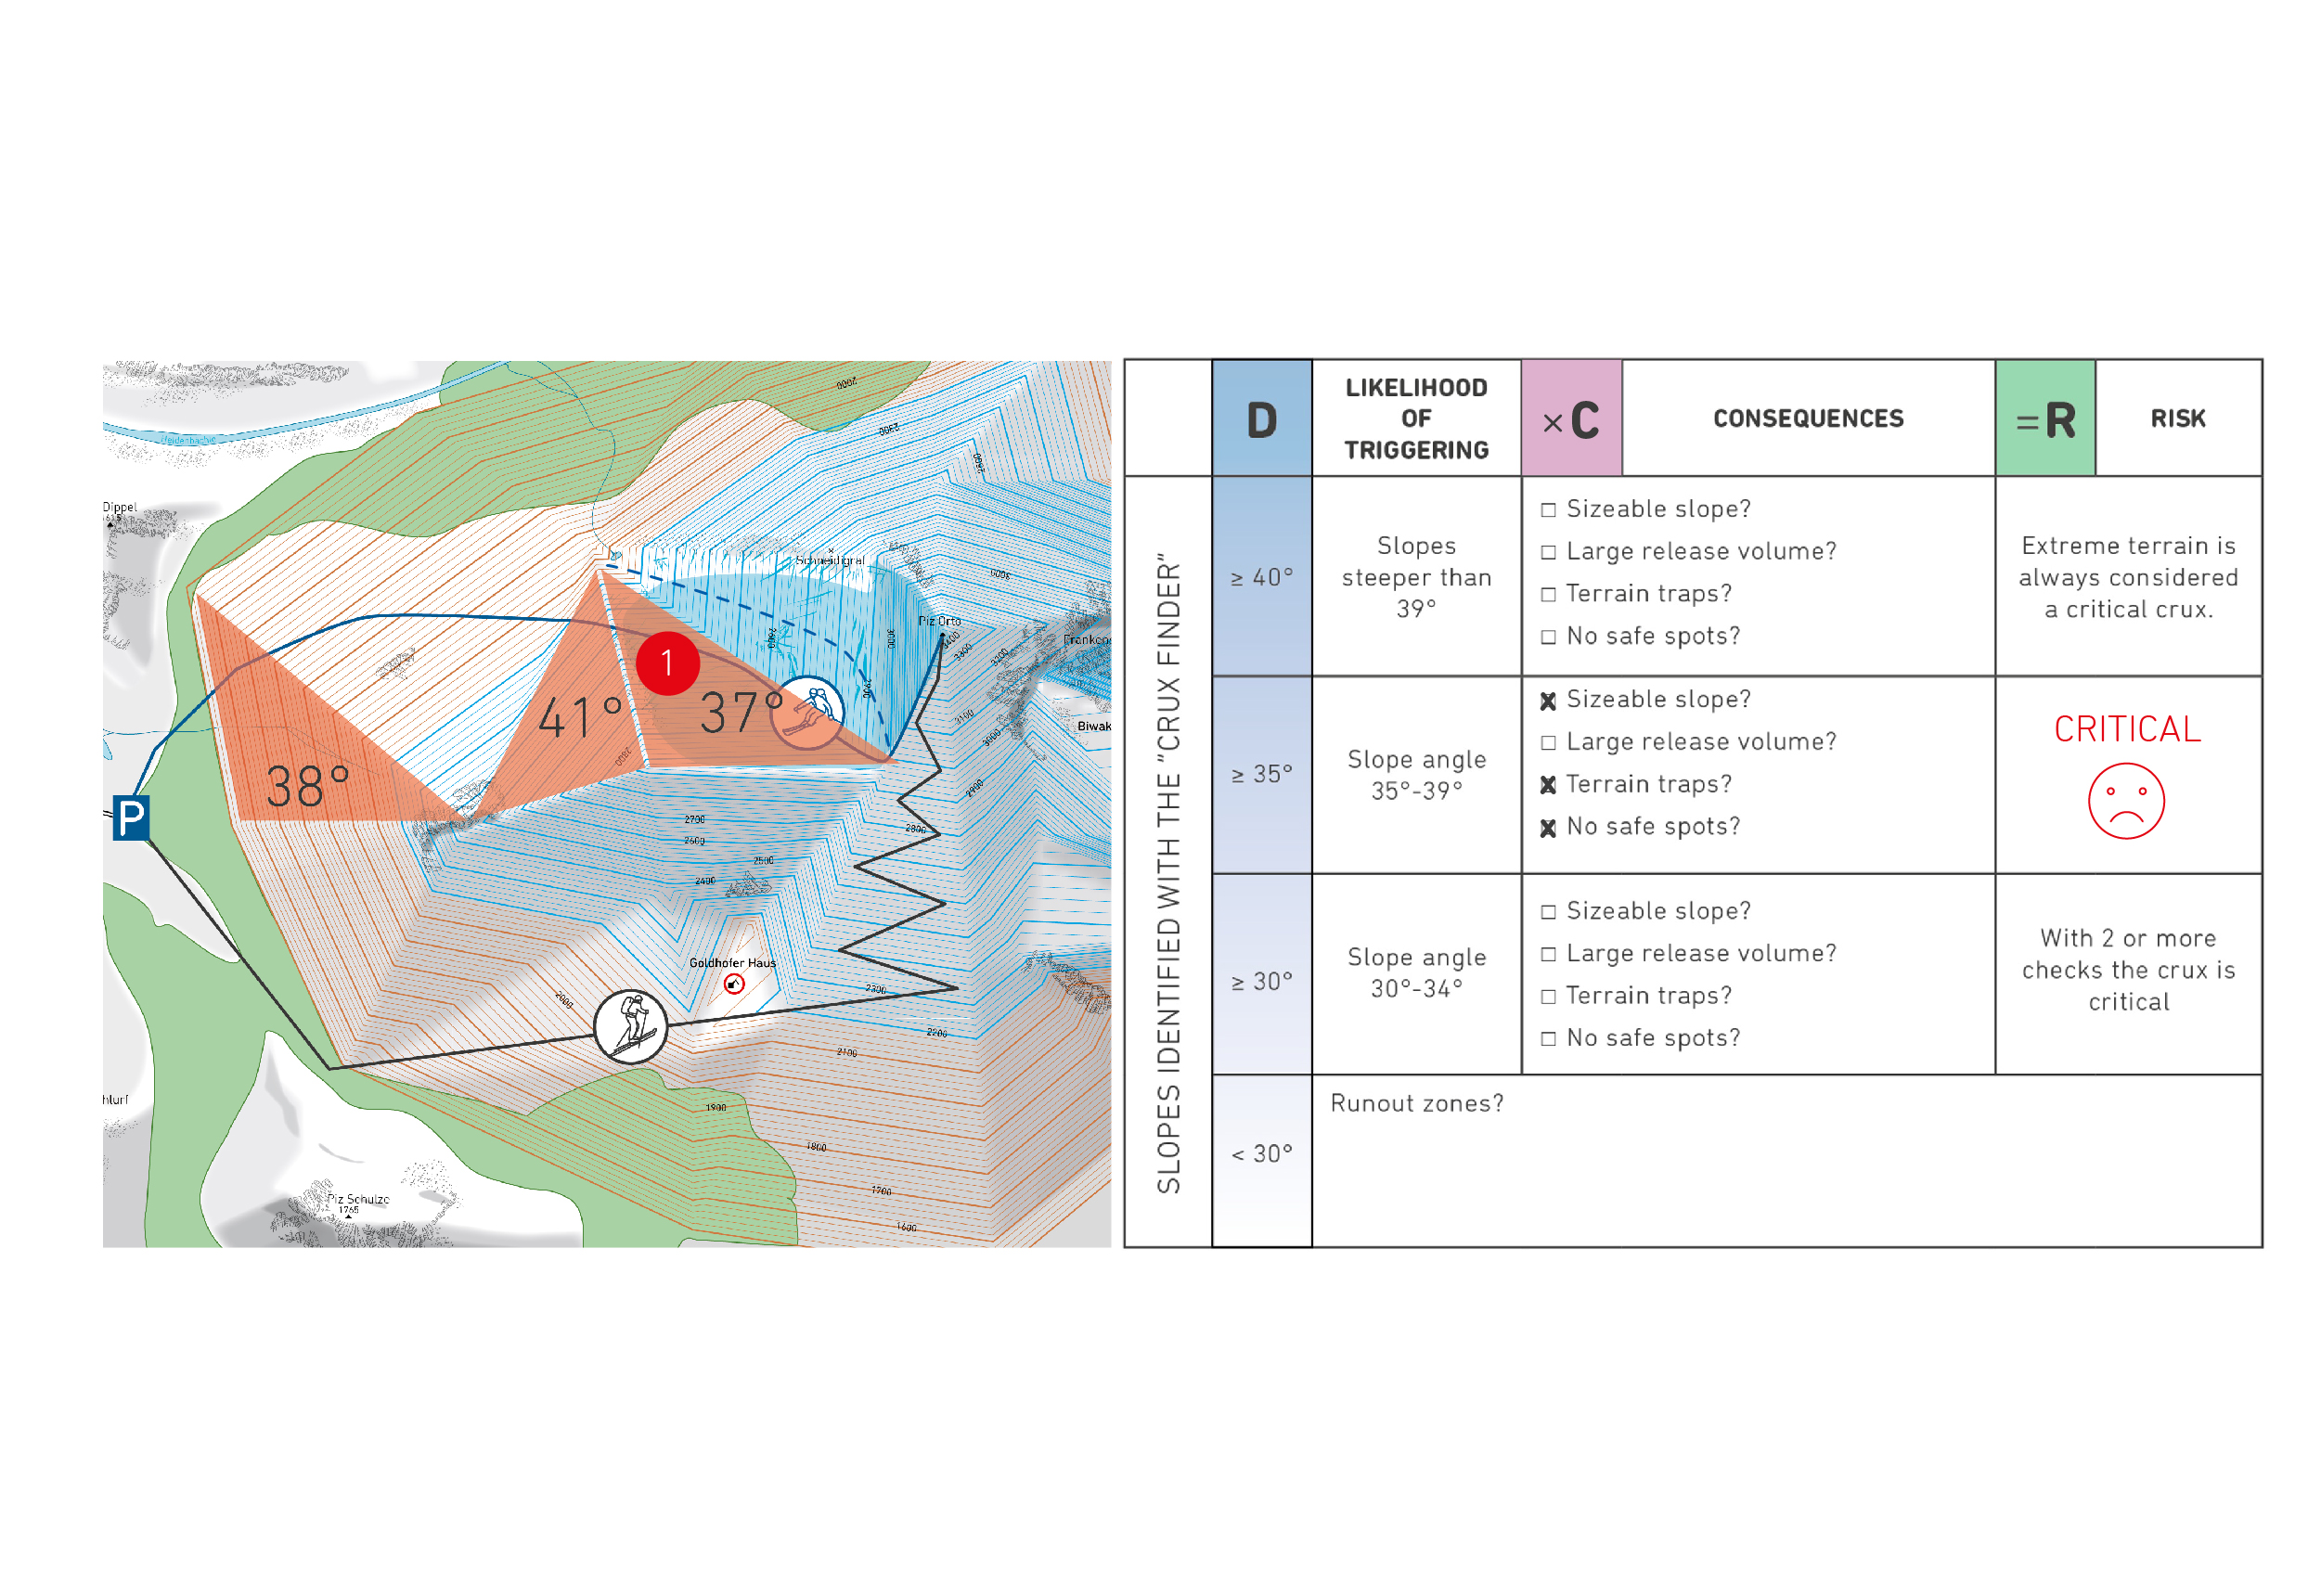
In our example, we have identified three cruxes using the 30° method.

EVALUATING SLOPE 1

Slope 1 has a steepness of 37° and is therefore in the 35°–39° category. Here, a maximum of one of the four consequence questions should be answered with “yes”. In our example, the slope is very big (>60 vertical meters) at 400 vertical meters, and there is a gully in the run out zone that would act as a pile-up zone and significantly increase burial depth. 
 We have two “yes” answers to the consequence questions here, and the crux is therefore critical. Therefore, it is advisable to consider an alternative (detour, alternative destination, plan B). 

It would be a good idea to avoid this slope by descending around it to the right. Here, you stay out of the dangerous areas listed in the avalanche bulletin and remain on a slope that is less steep than 30°. And there are no avalanche problems forecast for the steep slope above. Therefore, this option seems to be a safe alternative.

EVALUATING SLOPE 1

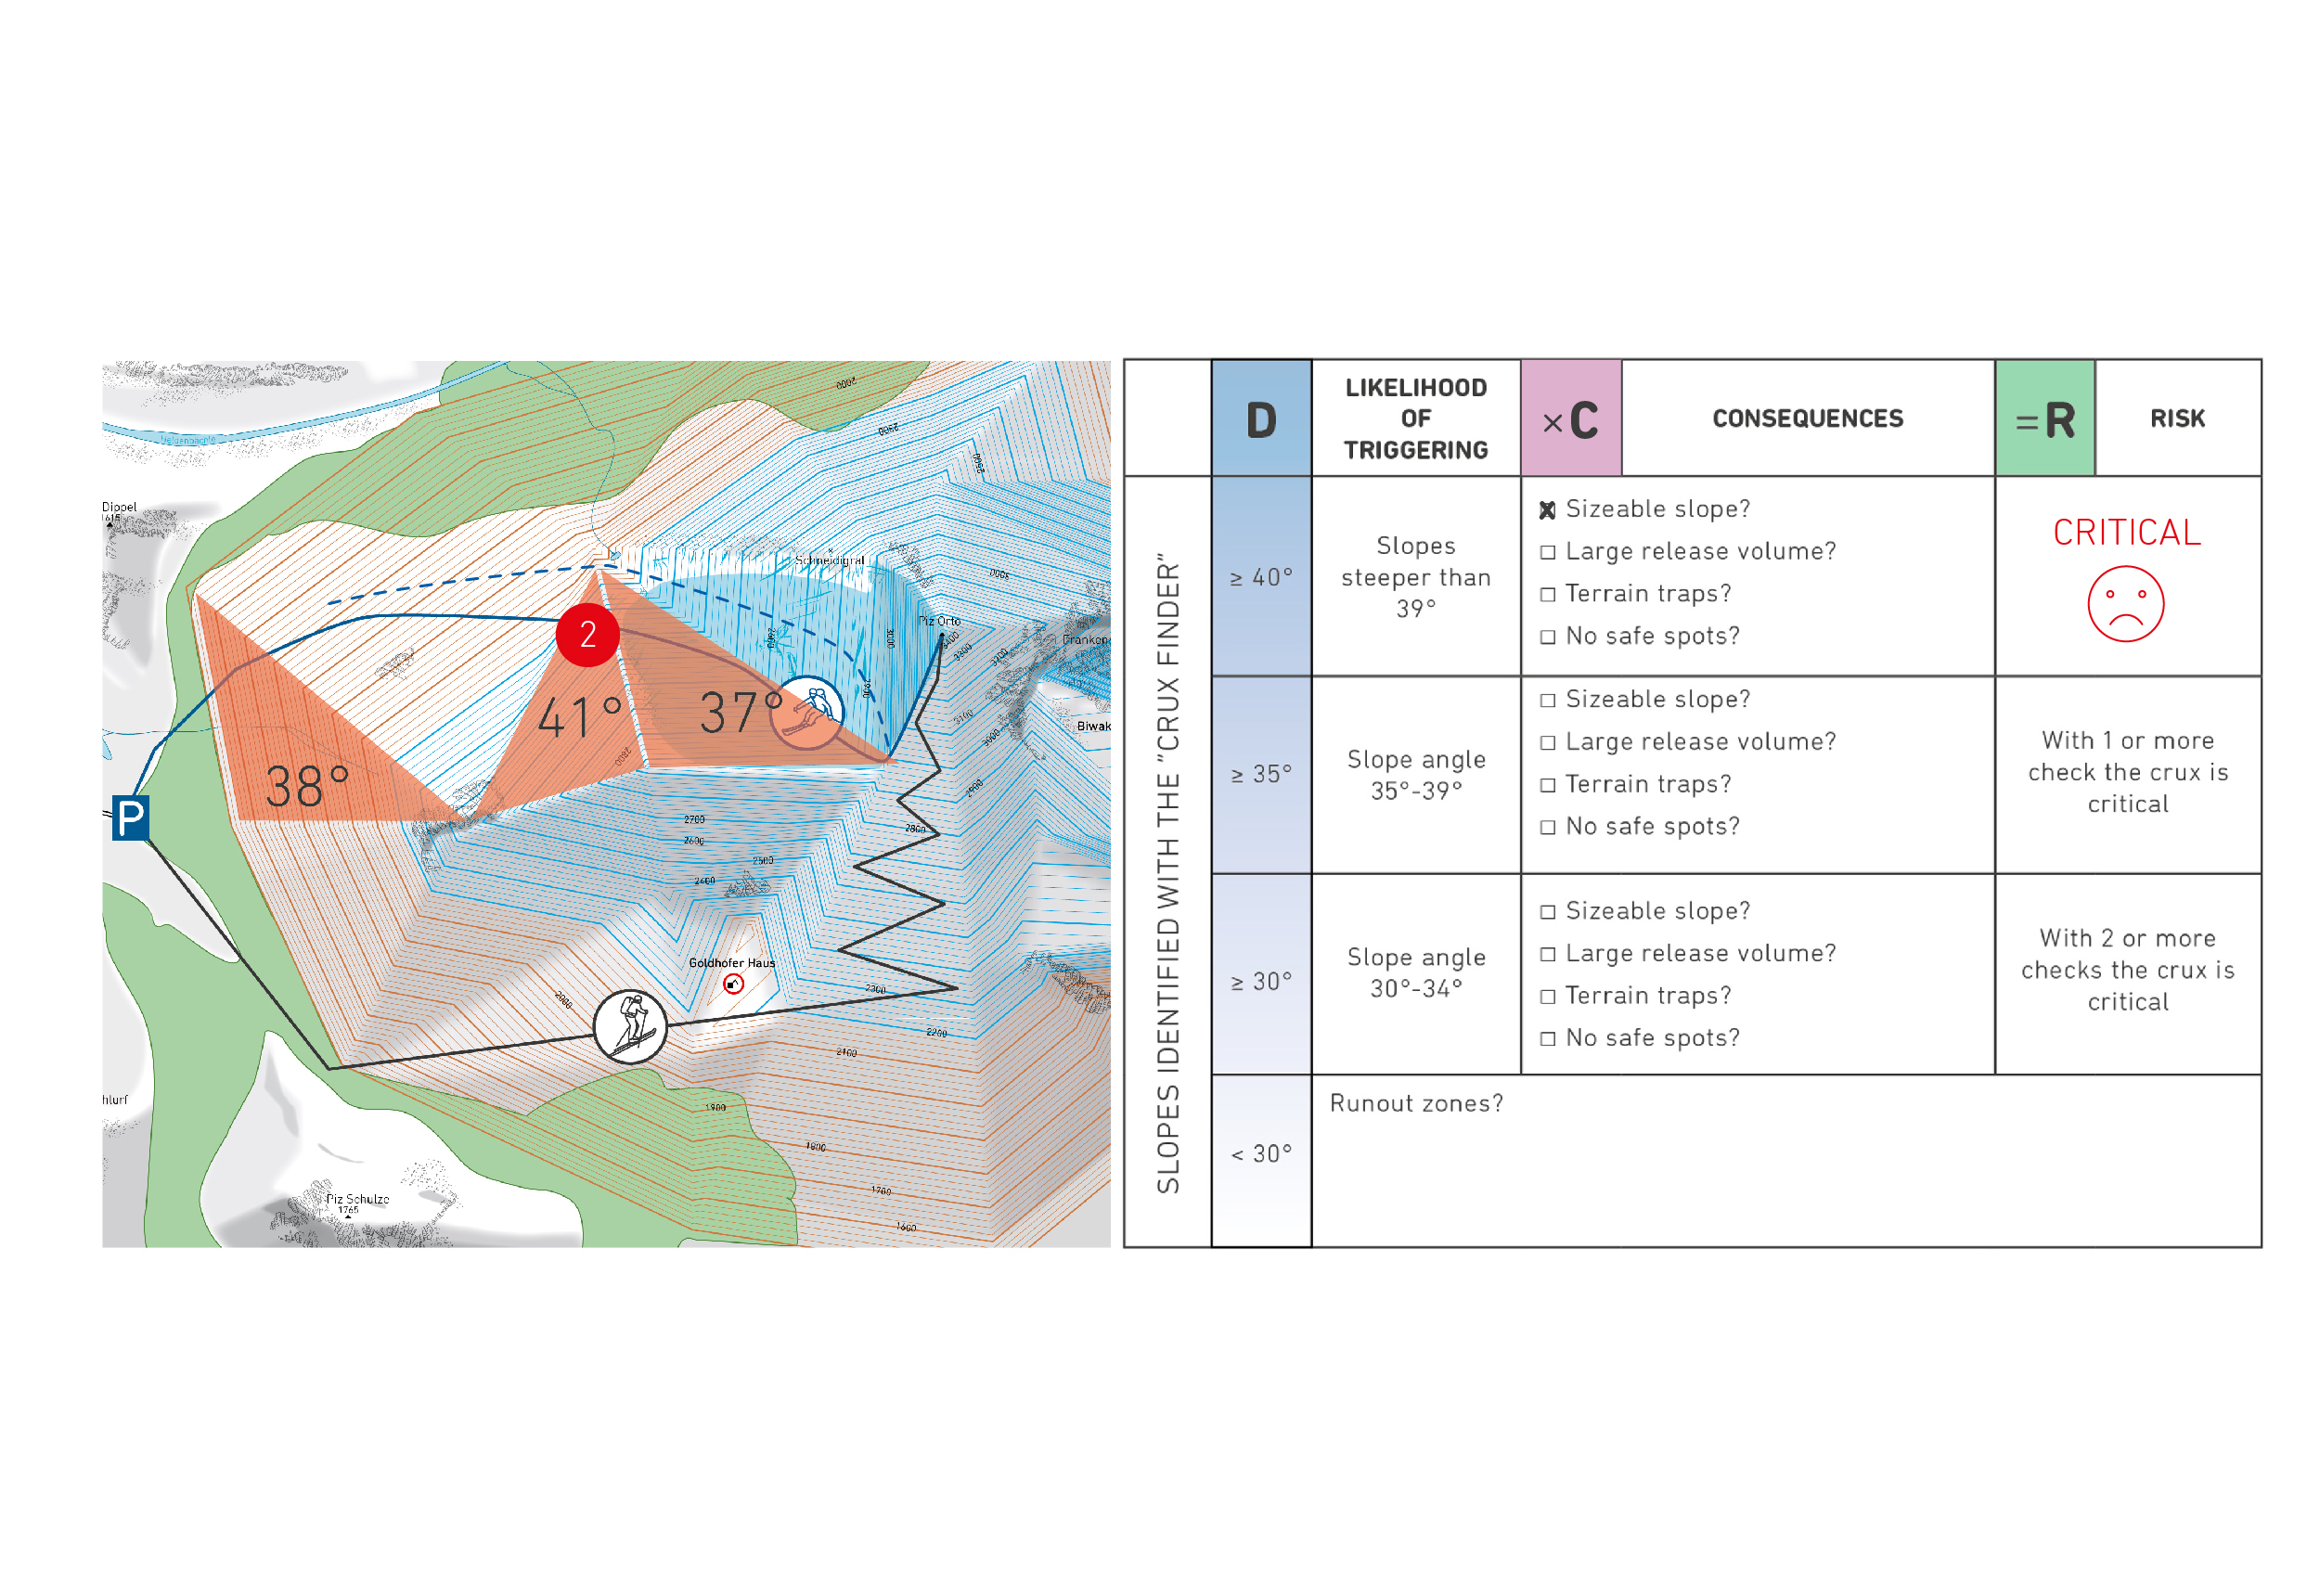
EVALUATING SLOPE 2

Slope 2 has a steepness of 41°. This slope is always classed as a “critical crux” even without “yes” answers to the consequence questions, because the steepness alone makes a fall caused by a small snowslide possible. Furthermore, in our example the slope is very big (>60 vertical meters). The slope is therefore a critical crux. Therefore, it is advisable to consider an alternative (detour, alternative destination, plan B). 

As with the first crux, it is a good idea to avoid this slope by descending around it to the right. Here, you stay out of the dangerous areas listed in the avalanche bulletin and remain on a slope that is less steep than 30°. There is a possible wind-drifted snow problem forecast for the steep slope above. The wind-drifted snow will be found in the upper area, and so a remote triggering from the flat area 400 vertical meters below the ridge is very unlikely. 

EVALUATING SLOPE 2

EVALUATING SLOPE 3

A possible temperature problem has been forecast for slope 3. At 38°, this slope is very steep. Here, a maximum of one of the four consequence questions should be answered with “yes”. In our example, the slope is very big (>60 vertical meters) at 300 vertical meters. And an avalanche would wash us down into the wooded areas below – posing a threat of physical injury (trees as a terrain trap). The slope is therefore a critical crux. Here, you also require an alternative (detour, alternative destination, plan B). 

As with the first crux, it is a good idea to avoid this slope by descending around it to the right. Here, you stay out of the dangerous areas listed in the avalanche bulletin and remain on a slope that is less steep than 30°. You might have to push a bit on the way back to the parking lot, but in return you will have a safe alternative. It is also very possible that, if you start early, the forecast water infiltration on the west-facing slope has not yet occurred. Therefore, the slope does not pose a problem and is a good detour option.

EVALUATING SLOPE 3

CONCLUSION

You can picture the interplay of the danger and consequences as two sliders that are adjusted for each slope. If the danger of an avalanche is high, the consequences must be correspondingly low – and vice versa. Ideally, both sliders would be low. If both are mid to high, you should pick an alternative. 

The example tour shows three critical cruxes, but each of them has an alternative. In addition, from the very first critical slope you have the option of traveling back down the safe ascent route. 

CONCLUSION

QUIZ: 30° METHOD 

The 30 degree method is used to identify dangerous areas and determine cruxes. This involves locating on the map all slopes 30 degrees or steeper along and above the route, regardless of the danger level.

Step 1 Step 2
30° Method

30° Method

NOW IT’S YOUR TURN!

The four building blocks of DCMR are: Recognize and assess Dangers; estimate Consequences; consider possible Measures; evaluate the Risk. The first thing to do is identify cruxes, i.e. determine the slopes where an avalanche could potentially occur. But how exactly do you do this?

Drag and drop the steps of the 30° method into the right order!

The planned route is to be drawn on the map (ascent, descent and variations).
If remote triggering is unlikely, we limit our selection to the slopes that we cross or ski on.
Identify potential hazardous sites (steeper than 30°) along or above the route.
We limit our selection to slopes that fit the description of dangerous areas reported in the avalanche bulletin.
Detailed assessment of the remaining cruxes.

Unfortunately, that was the wrong order! Try again!

Congratulations!

You have answered the 30° method quiz correctly.

PRACTICAL AIDS TO DOWNLOAD

You can click on the following link to download practical tools that will help you identify cruxes when planning a tour, link dangers and consequences and then assess the resulting risk.